


Knowledge Base
VNCI PT3G wirless connection configuration guide
Solved Ford VCI software show "Update VCI" problem
When using IDS v132 software or the latest FDRS software, the system prompts that the VCI Device Manager must be updated to the latest version. After the update, running IDS v132 or FDRS software with the VNCI VCM3 will result in failure to establish communication with the vehicle. This issue is caused by incompatibility between the current device firmware and the latest Ford VCI driver. The solution is as follows:
First, restore the VNCI VCM3 device to its factory settings.
https://vnciobd.com/?article/VNCI-Factory-Reset-Operation.html
Second, add the offline upgrade executable file `esp32_ota2.exe` to the firewall.
Finally, Use the VNCI VCM3 offline upgrade program to upgrade the VNCI VCM3 firmware to version v1.0.1.4. The download link for the VNCI VCM3 offline upgrade package is as follows:
https://ln5.sync.com/dl/225763dd0#rv8edtaj-6fbw4kaq-3awi9p48-8ymx4t6u
Note: it must be connect your VNCI VCM3 to your computer
Solved JLR “VCI Update” problem
解决安装路虎最新的驱动程序后,SDD和pathfinder软件通信不正常的问题
1. 安装最新的驱动软件
https://diagnosticdelivery.jlrext.com/idscentral/jlr_v9.7.2798.42_setup.exe.zip
参考说明: https://vnciobd.com/?article/VNCI-Factory-Reset-Operation.html
3. 下载安装VNCI设备管理器, 然后将设备固件升级到最新版本
VNCI设备管理器
https://ln5.sync.com/dl/cc17552a0#r4yqxaqs-iiuq2g4x-b9v8ef4n-3putav7v
4. 安装JLR VCI 设备管理器 v9.7.2798.42后,该版本不支持 SDD 和 Pathfinder 软件。
因此你需要将PDUAPI_Bosch.dll文件复制到以下路径以解决该问题:
"C:Program Files (x86)BoschVTX-VCIVCI Software (JLR)ProductsJLR-DoIPDoIP"
PDUAPI_Bosch.dll 下载地址:https://ln5.sync.com/dl/236399d50#qayjve8k-7k5fe6vj-d3qb5t85-hm5xsj67
Solved new jlr vci device manager do not support sdd and pathfinder software problem
1. Install the latest JLR VCI driver software
https://diagnosticdelivery.jlrext.com/idscentral/jlr_v9.7.2798.42_setup.exe.zip
2. Restore VNCI JLR DoIP to factory settings
Reference instructions:
https://vnciobd.com/?article/VNCI-Factory-Reset-Operation.html
3. Download and install the VNCI Device Manager, then upgrade the device firmware to the latest version VNCI Device Manager
https://ln5.sync.com/dl/cc17552a0#r4yqxaqs-iiuq2g4x-b9v8ef4n-3putav7v
4. when you installed JLR VCI device manager v9.7.2798.42, it will not be support SDD and pathfinder software
So you have to copy PDUAPI_Bosch.dll to following folder to solved the problem
“C:Program Files (x86)BoschVTX-VCIVCI Software (JLR)ProductsJLR-DoIPDoIP”
PDUAPI_Bosch.dll download address:
https://ln5.sync.com/dl/236399d50#qayjve8k-7k5fe6vj-d3qb5t85-hm5xsj67
Solved VCM3 newest driver compatible problem
When using IDS v132 software or the latest FDRS software, the system prompts that the VCI Device Manager must be updated to the latest version. After the update, running IDS v132 or FDRS software with the VNCI VCM3 will result in failure to establish communication with the vehicle. This issue is caused by incompatibility between the current device firmware and the latest Ford VCI driver. The solution is as follows:
First, restore the VNCI VCM3 device to its factory settings.
Second, add the offline upgrade executable file `esp32_ota2.exe` to the firewall.
Finally, Use the VNCI VCM3 offline upgrade program to upgrade the VNCI VCM3 firmware to version v1.0.1.4. The download link for the VNCI VCM3 offline upgrade package is as follows:
https://ln5.sync.com/dl/225763dd0#rv8edtaj-6fbw4kaq-3awi9p48-8ymx4t6u
Note: it must be connect your VNCI VCM3 to your computer
ODIS software installation guide
Solved New JLR VCI device compatible problem
解决安装路虎最新的驱动程序后,SDD和pathfinder软件通信不正常的问题
1. 安装最新的驱动软件
https://diagnosticdelivery.jlrext.com/idscentral/jlr_v9.7.2798.42_setup.exe.zip
2. 将VNCI JLR DoIP恢复出厂设置
参考说明: /knowledge/?wptk_doc=3
3. 下载安装VNCI设备管理器, 然后将设备固件升级到最新版本
VNCI设备管理器
https://ln5.sync.com/dl/cc17552a0#r4yqxaqs-iiuq2g4x-b9v8ef4n-3putav7v
4. 安装JLR VCI 设备管理器 v9.7.2798.42后,该版本不支持 SDD 和 Pathfinder 软件。
因此你需要将PDUAPI_Bosch.dll文件复制到以下路径以解决该问题:
"C:Program Files (x86)BoschVTX-VCIVCI Software (JLR)ProductsJLR-DoIPDoIP"
PDUAPI_Bosch.dll 下载地址:https://ln5.sync.com/dl/236399d50#qayjve8k-7k5fe6vj-d3qb5t85-hm5xsj67
Solved new jlr vci device manager do not support sdd and pathfinder software problem
1. Install the latest JLR VCI driver software
https://diagnosticdelivery.jlrext.com/idscentral/jlr_v9.7.2798.42_setup.exe.zip
2. Restore VNCI JLR DoIP to factory settings
Reference instructions:
3. Download and install the VNCI Device Manager, then upgrade the device firmware to the latest version VNCI Device Manager
https://ln5.sync.com/dl/cc17552a0#r4yqxaqs-iiuq2g4x-b9v8ef4n-3putav7v
4. when you installed JLR VCI device manager v9.7.2798.42, it will not be support SDD and pathfinder software
So you have to copy PDUAPI_Bosch.dll to following folder to solved the problem
“C:Program Files (x86)BoschVTX-VCIVCI Software (JLR)ProductsJLR-DoIPDoIP”
PDUAPI_Bosch.dll download address:
https://ln5.sync.com/dl/236399d50#qayjve8k-7k5fe6vj-d3qb5t85-hm5xsj67
VNCI RNM diagnosis 2023MY Nissan Ariya EV car with VNCI RNM. communicate protocol is doip.
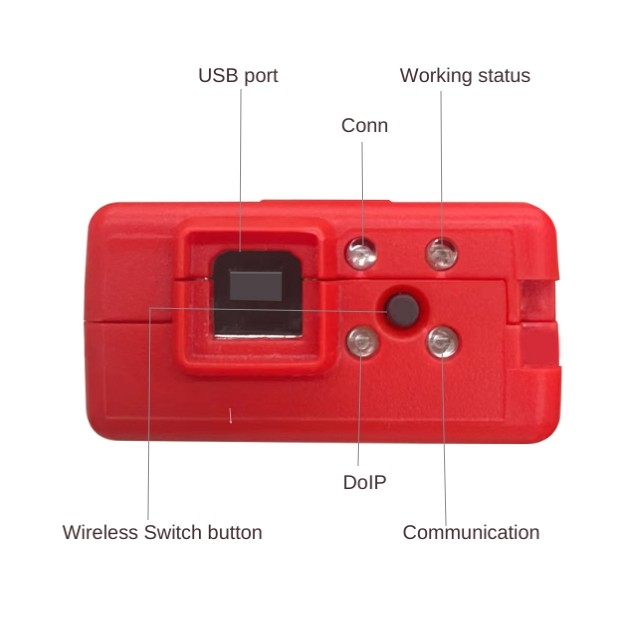
VNCI RNM/JLR/VCM3/6516SZ/VDI3 Factory Reset Operation
博世系列产品恢复出厂设置方法
1. 断开所有连接
2. 按住指示灯附近按钮, 并保持按住状态不放手
3. 将USB线和连接电脑和设备, 直到设备发出一声“滴滴”响声,然后松开手
4. 最后, 在电脑端打开VNCI设备管理器把设备固件升级到最新即可。
Method to restore Bosch series products to factory settings
1. Disconnect all connections
2. Press and hold the button near the indicator light without releasing it
3. Connect the computer and the device with a USB cable until the device makes a "di-di" sound, then release the button.
4. Finally, open the VNCI Device Manager on the computer and upgrade the device firmware to the latest version.
Install Consult 3 plus software and actived immobilizer function with VNCI RNM
VNCI PT3G wireless connection configuration details
Step1: Upgrade new version
you have to install newest version vnci pt3g device manager and upgrade the vnci pt3g firmware to the latest version, as shown below picture.
new version now(2024-07-04)
VNCI Device manager v2.0
firmware version: 1.0.6.3

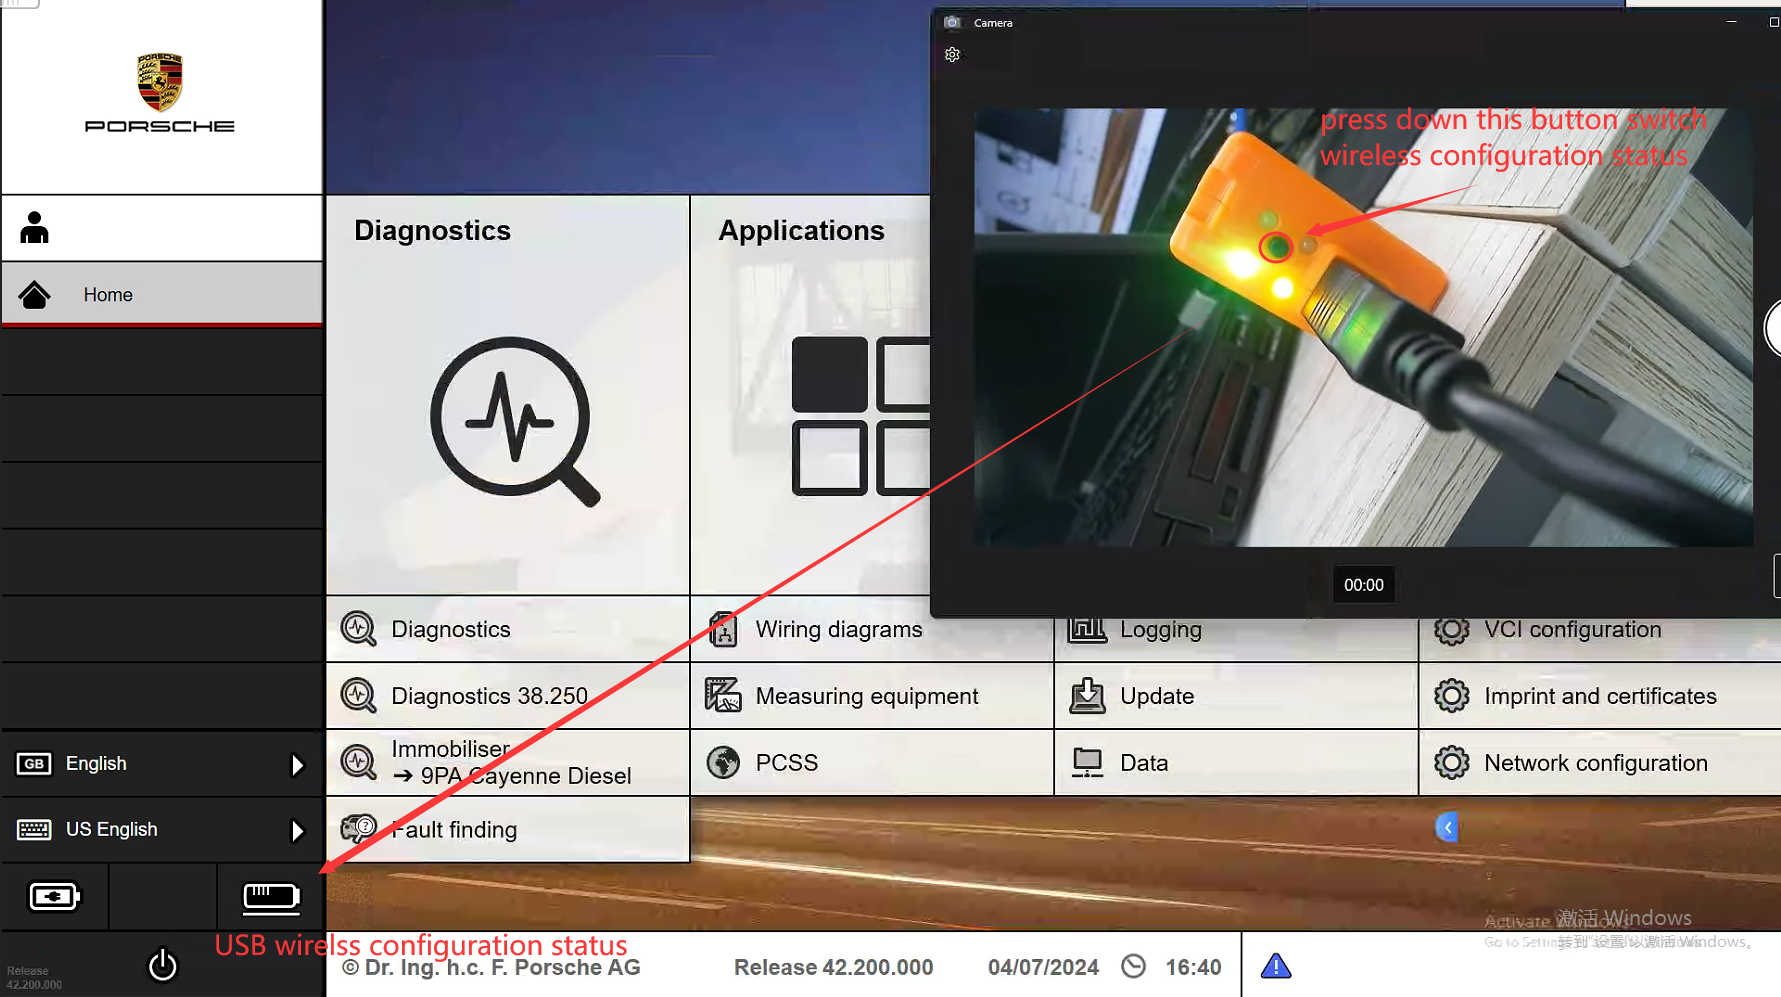
Step2: Connect VNCI PT3G to the piwis software and switch to the USB cable wireless configuration state.
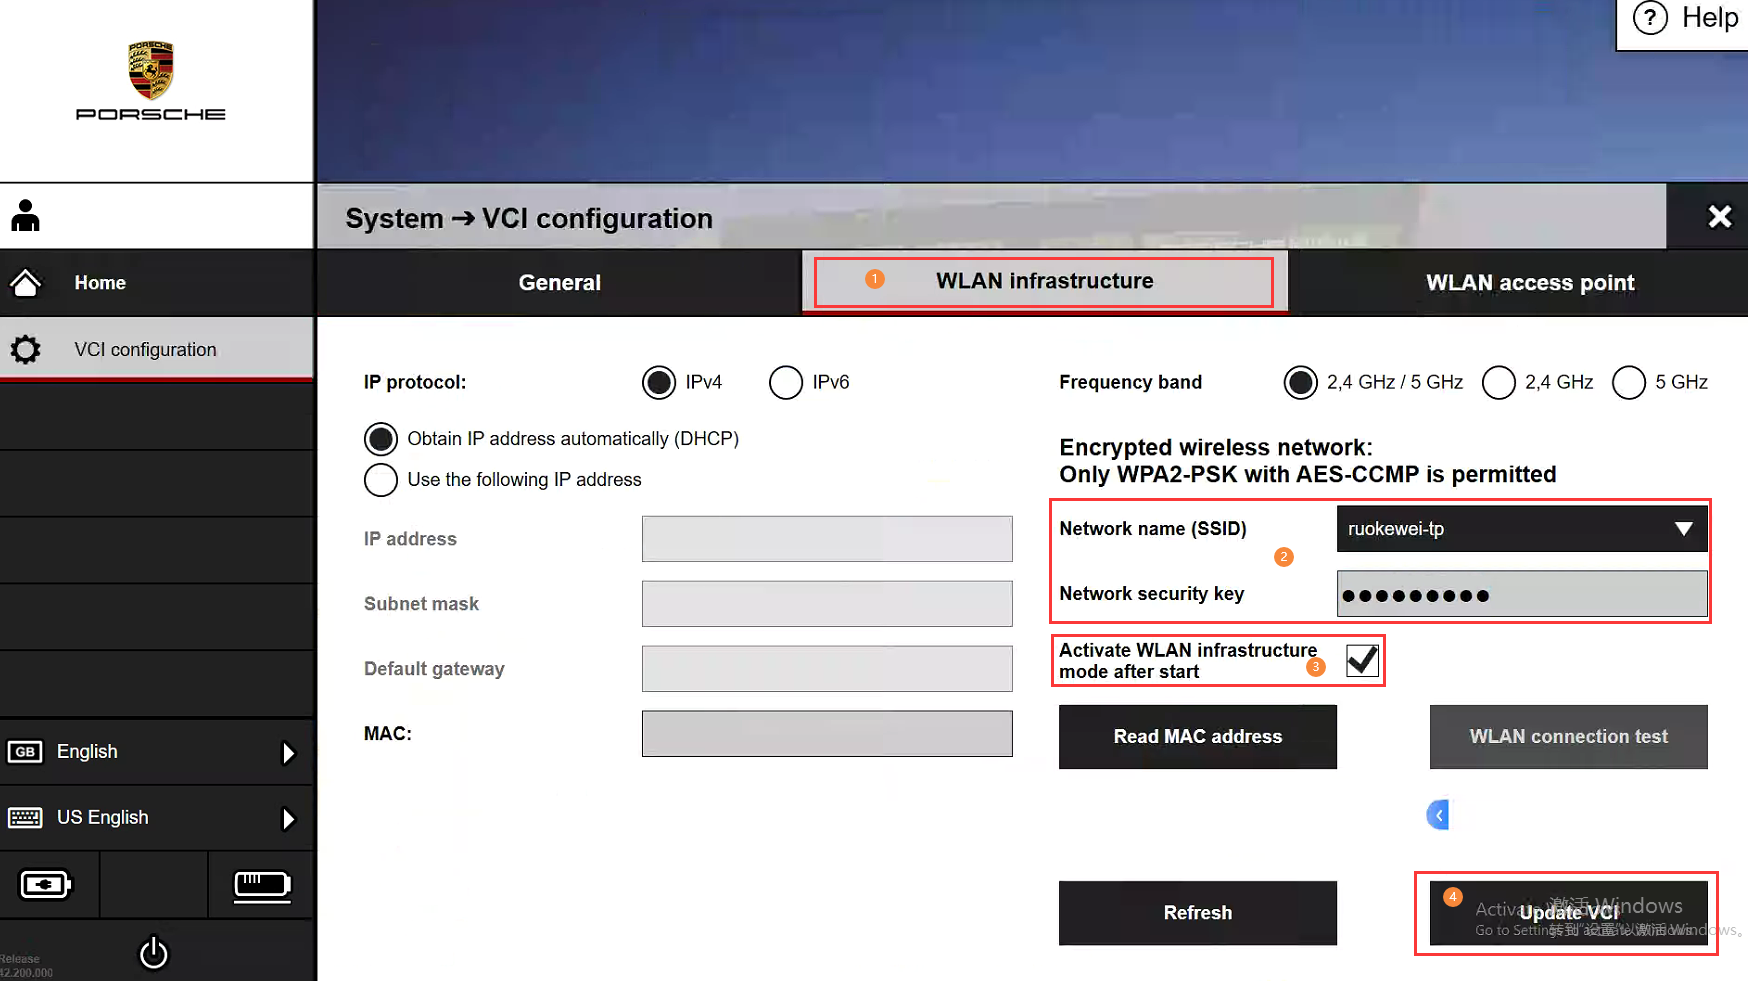
Step3: Configure the WLAN connection and AP connection network information
1. WLAN connection information configured, as shown below picture
① select "VCI configuration->WLAN Infrastructure" menu
② enter your network name and passoword
③ This check box must be checked
④ After entering all the correct configuration information, click “Update VCI” button to save the configuration information
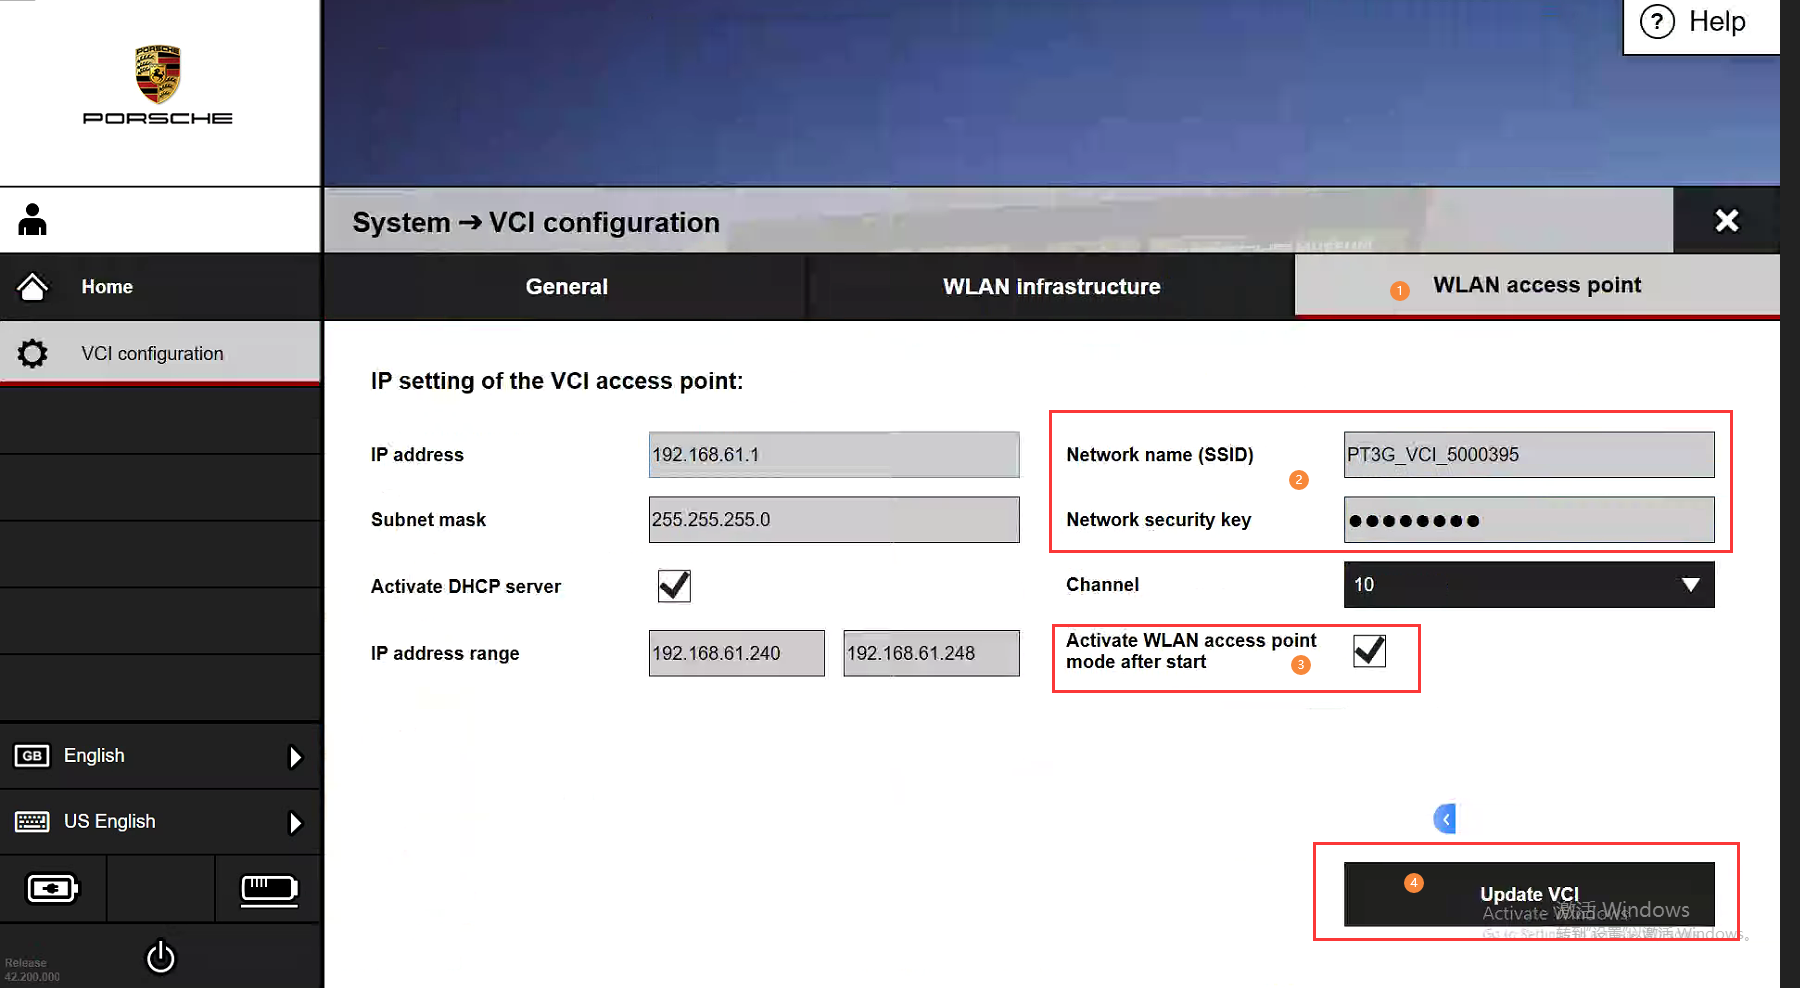
2 . AP(Access point) connection information configured,as shown below picture
① select "VCI configuration->WLAN access point" menu
② Custom wireless network name(Default network name is “PTG_VCI_{device number}”) and password
③ This check box must be checked
④ After entering all the correct configuration information, click “Update VCI” button to save the configuration information
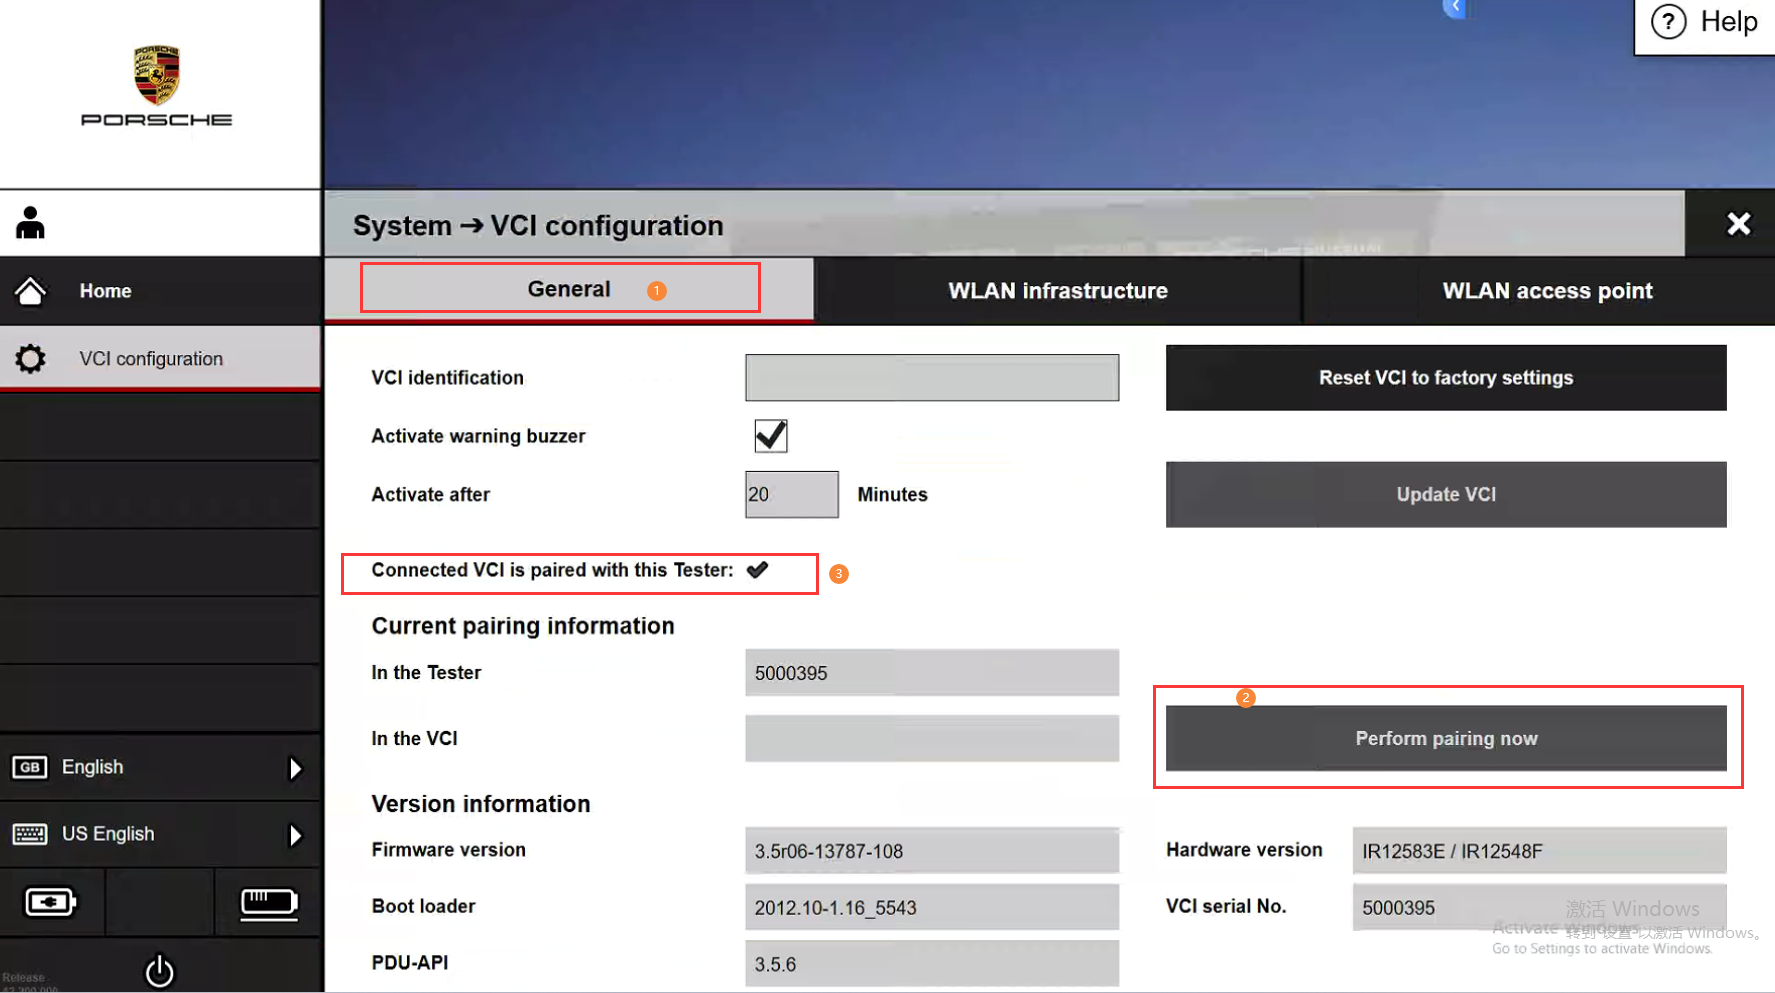
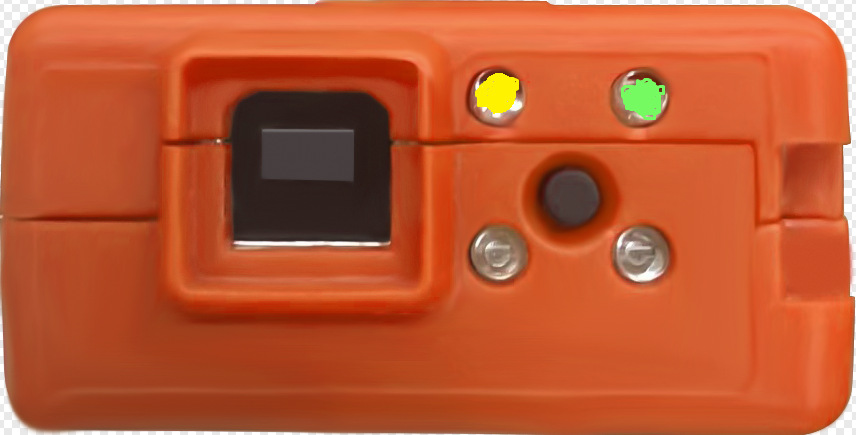
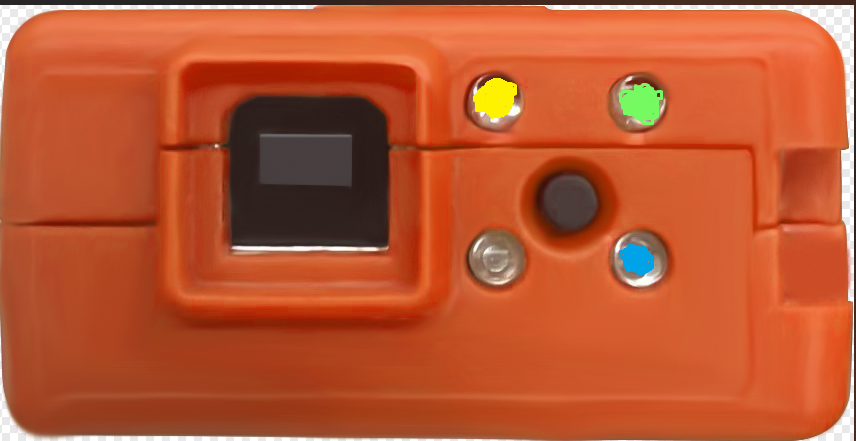
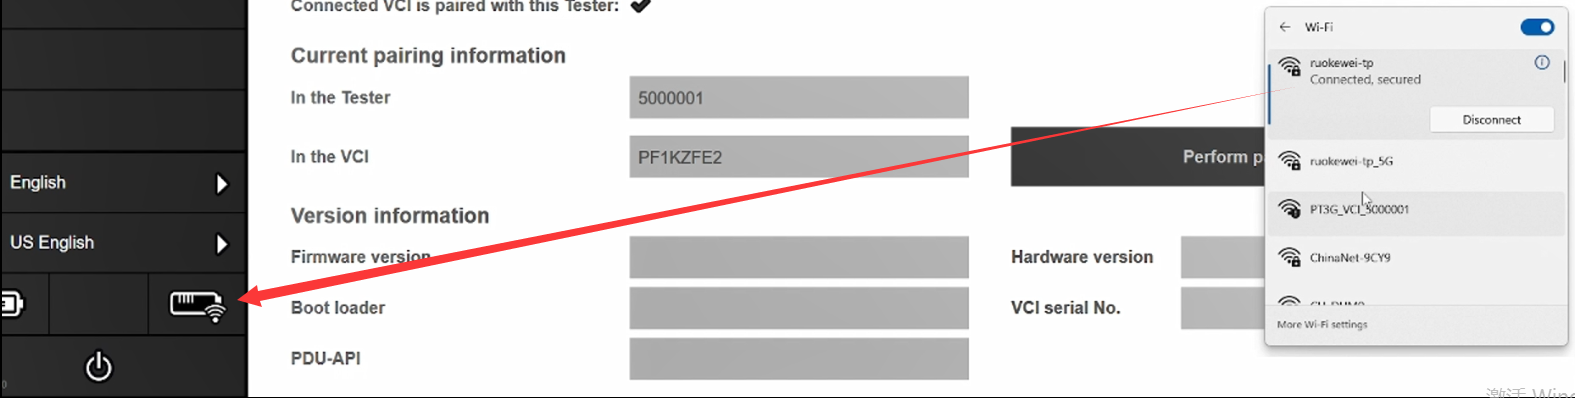
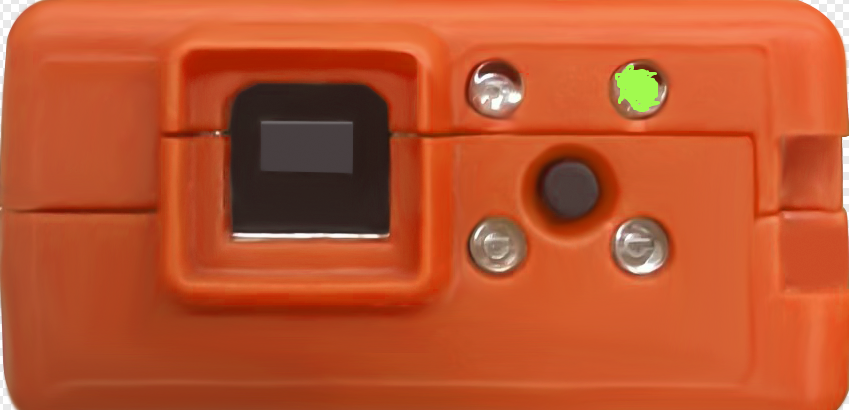
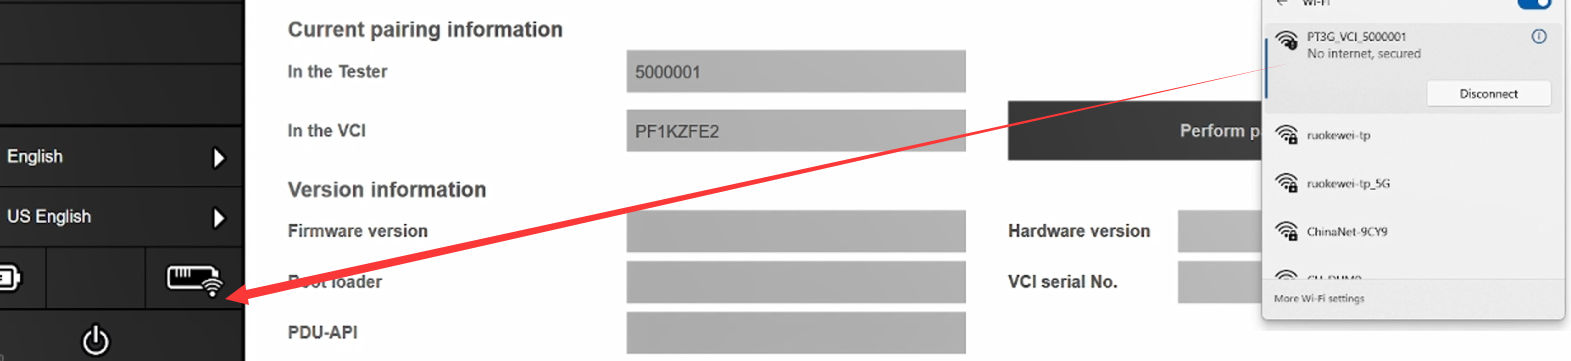
Step4: Pairing the current computer PIWIS3 system and VNCI PTG configuration information ( Very important! Very important! Very important! )
After the WLAN connection and AP connection configuration information are configured, you need to perform the matching operation on the PIWIS3 software of the current computer to use VNCI PT3G wireless connection on the current computer. Each time you replace the PIWIS computer, the VNCI PT3G wireless connection information must be matched again(important!!! important!!! important!!! )
As shown below picture
①select "VCI configuration->WLAN access point" menu
② Click "perform pairing now" button
③ If the pairing is successful, here is a "✔", if the pairing is unsuccessful here is "X"
Step5: Disconnect usb port, Restart PIWIS3 software
1. Wirless connection by WLAN infranstructure
①Ensure that the current computer is connected to the network as same as the VNCI PT3G WLAN configuration network
②connect VNCI PT3G to your car or OBD16 power supply, Press and hold the VNCI PT3G button until the led light status changes, as shown bellow picture
WLAN Infranstructure connection LED light two status
③When VNCI PT3G connect to PIWIS3 software by WLAN Infranstructure , The VNCI PT3G make a deep sounds, and piwis3 software will show wireless connection icon, as shown bellow picture
1. Wirless connection by WLAN Access point connection mode
① Connect VNCI PT3G to your car or OBD16 power supply, Press and hold the VNCI PT3G button until the led light status changes, as shown bellow picture.
AP(Access point) connection LED light two status
② Enter the AP connection custom password, and after the device make a long deep sound, the PIWIS3 system will have a wireless connection icon, as shown bellow picture.
Note: The AP connection uses a wireless adapter, and when you have only one wireless adapter in your computer, you will not be able to access the Internet. If you want to connect to the Internet, you'll need an external wireless adapter.
Use VNCI RNM to do 2020MY TEANA ABS module progtramming
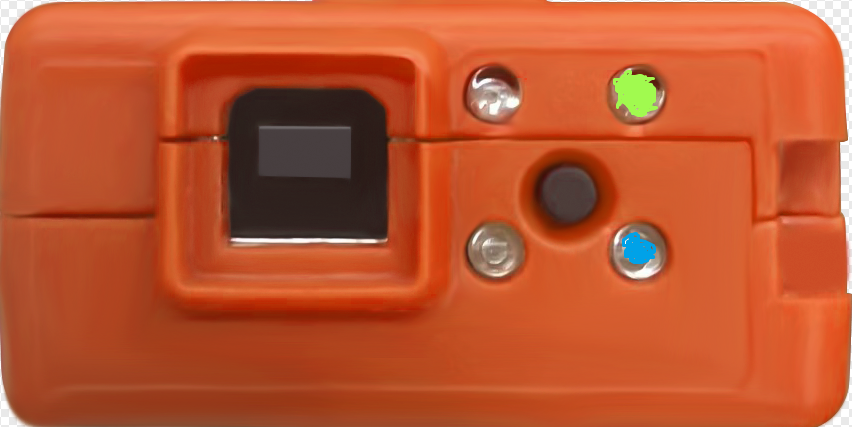
VNCI 6154A AP connection and WALN connection configuration
AP connection configure
Default WIFI SSID : {VNCI 6154A serial number}
Default WIFI Password: 12345678
Usage method:
1. First connect the VNCI 6154A to the car or OBD16 for power supply
2. In the wireless network search box, find the VNCI 6154A WIFI SSID, enter the password and connect
Note: The AP connection uses one of your computer's wireless cards. If your computer only has one wireless card, you will not be able to access the Internet. The solution is to add an external wireless adapter
Customize the VNCI 6154A WIFI SSID and password:
1. First connect the VNCI 6154A to your computer via USB cable
2. Open your browser to access the following address: 192.168.13.69
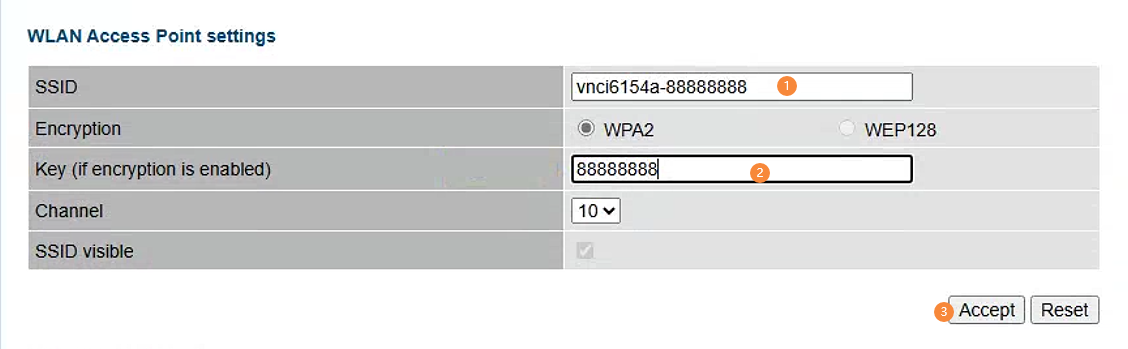
3. Click “CONNECTIVITY->WLAN Access Point” menu and then Select “WLAN operating mode after startup”, As shown in the following picture.
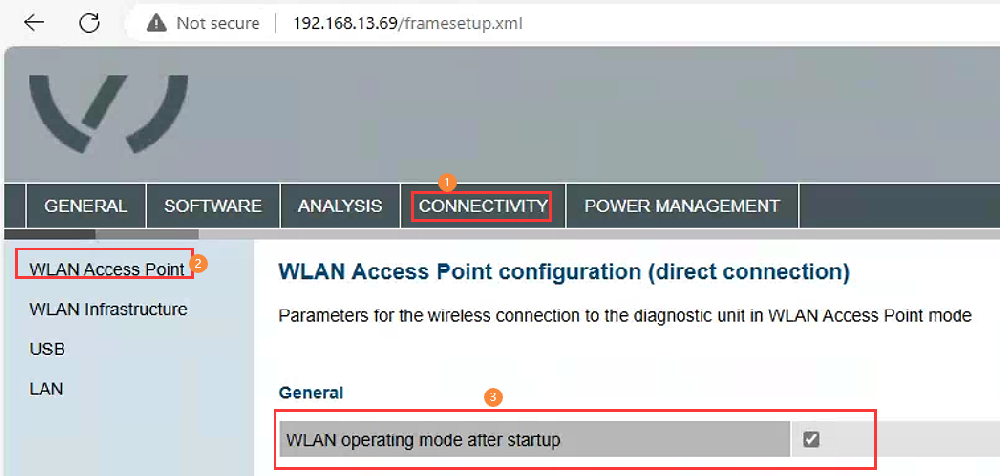
4. Configure your custom WIFI SSID and password on the current page, then click Accept.
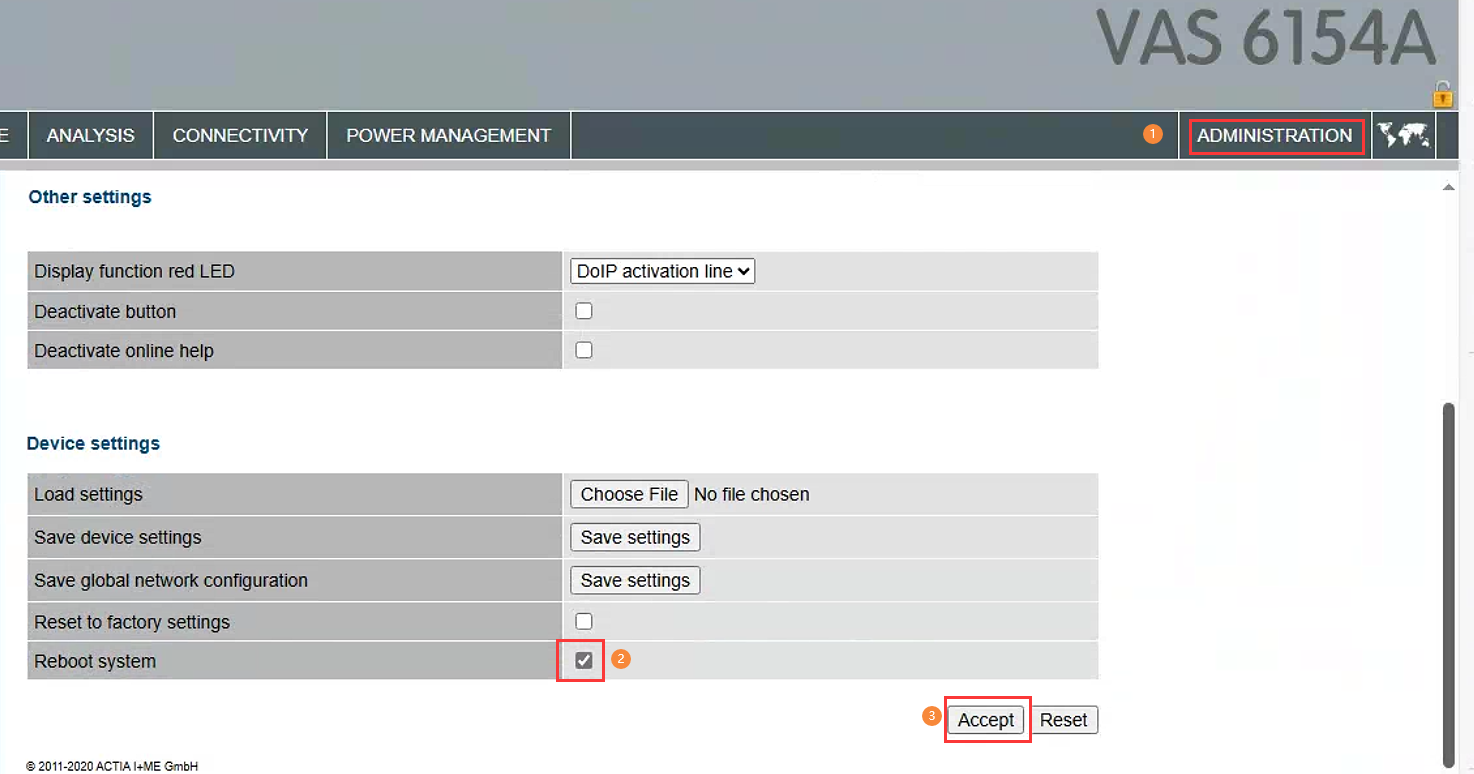
5. Select the "ADMINISTRATIOR" menu in the upper right corner, drop it to the bottom of the current page, select" Reboot System ", and click "Accept" to complete the configuration, After a successful restart, the device will make a deep sound, As shown below.

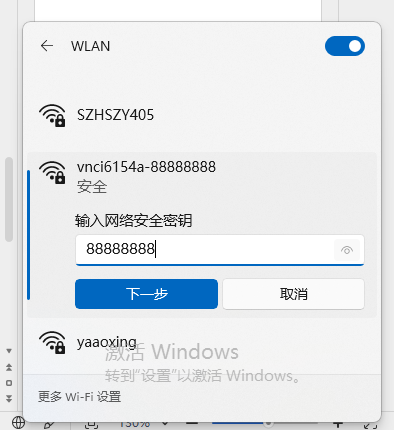
6. Disconnect the USB connection, connect the VNCI 6154A device to the car or OBD16 for 12v power, find our configured wireless information in the WIFI search box, select the custom SSID and enter the password to connect, As shown in the following picture.
WLAN connection configure
1. First connect the VNCI 6154A to your computer via USB cable
2. Open your browser to access the following address: 192.168.13.69
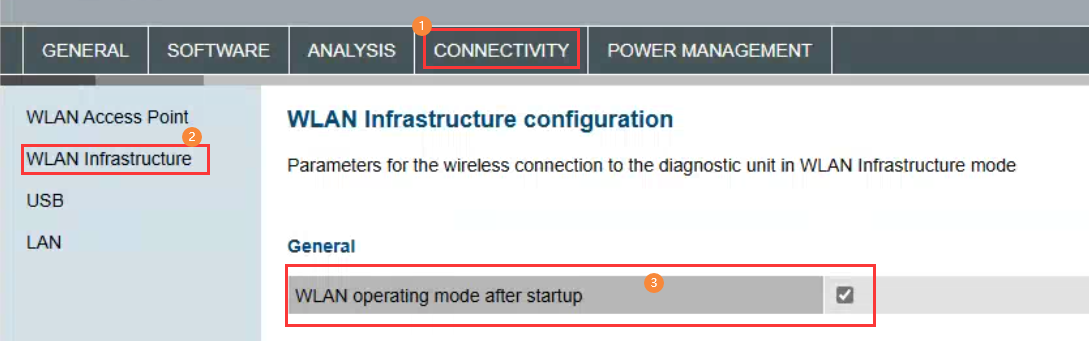
3. Click “CONNECTIVITY->WLAN Infrastructure” menu and then Select “WLAN operating mode after startup”, As shown in the following picture.
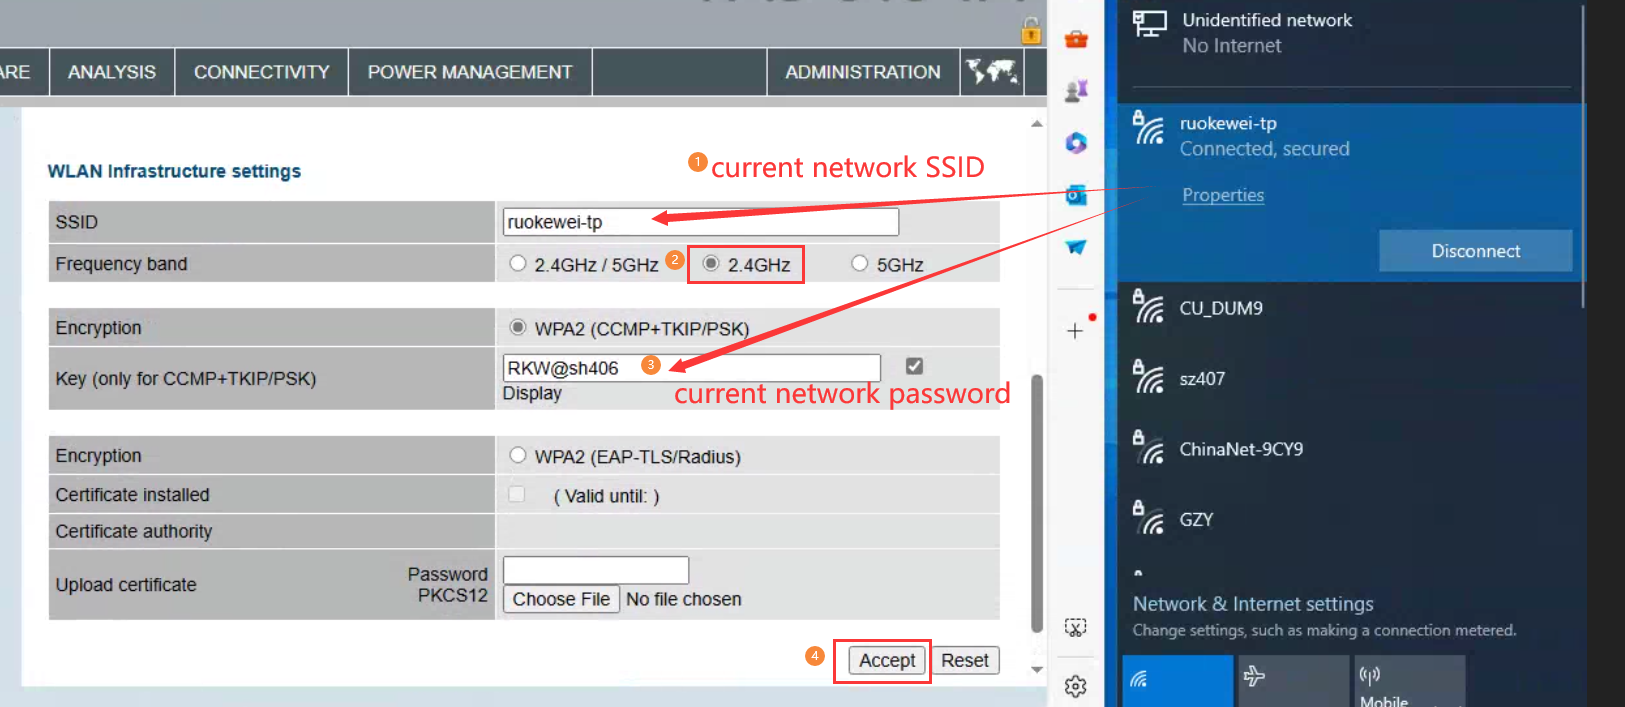
4. Drop down the current page to set the current WLAN SSID and password, After configuring the SSID and password and selecting the 2.4GHz communication frequency, and then click the Accept button, As shown in the following picture.
5. Select the "ADMINISTRATIOR" menu in the upper right corner, drop it to the bottom of the current page, select" Reboot System ", and click "Accept" to complete the configuration, After a successful restart, the device will make a deep sound. As shown below.
6. At this point, the VNCI 6154A device information has been added to the current WLAN "ruokewei-tp"(your WLAN), disconnect the USB cable, connect the VNCI 6154A device to your car or power the device with a 12 volt OBD16, when the VNCI 6154A make a long deep sounds, it indicate the VNCI 6154A device can be connected to any computer that using the same WLAN "ruokewei-tp"(your local area Network).
Note:
1. The frequency of the router that distributes the wireless LAN must be 2.4Ghz, and 5Ghz is not supported.
2. After you configure the AP connection and WLAN connection information, you can switch the AP connection and WLAN connection through the middle button of the device LED
VNCI MDI2 GM offline software(Tech2win/GDS2/DPS) installation guide, and actived Tech2win/GDS2/DPS s
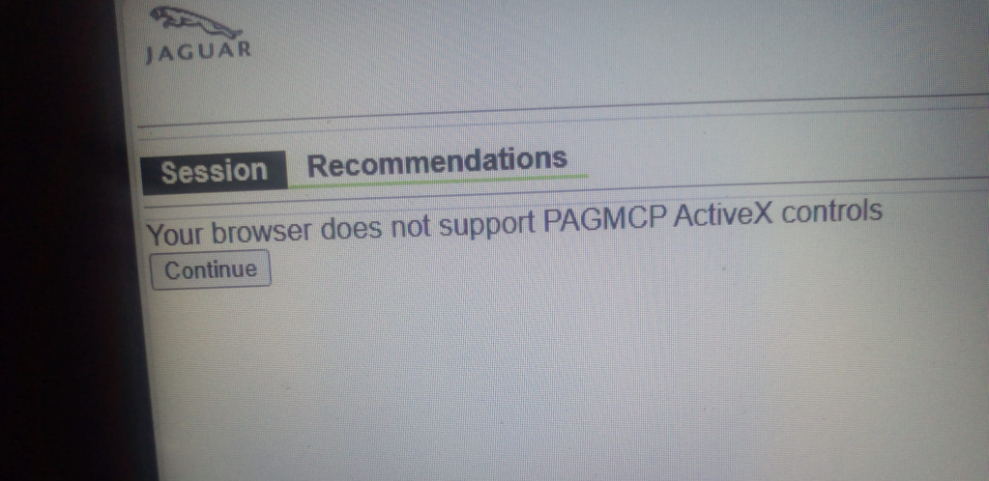
Solved JLR SDD2 software and Edge broswser compatibility problem
When you use SDD2 software on windows10/11 system, it will have the following problems
"Your browser does not support PAGMCP ActiveX controls"
or
“SDD software updates have not been performed so functionality has been disabled. Click here to perform updates now”
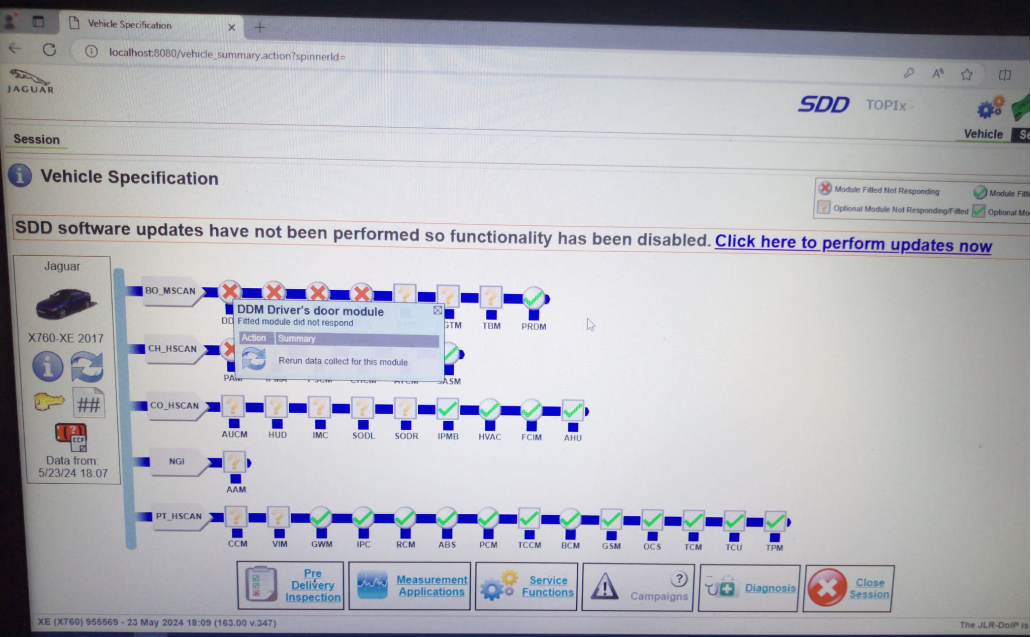
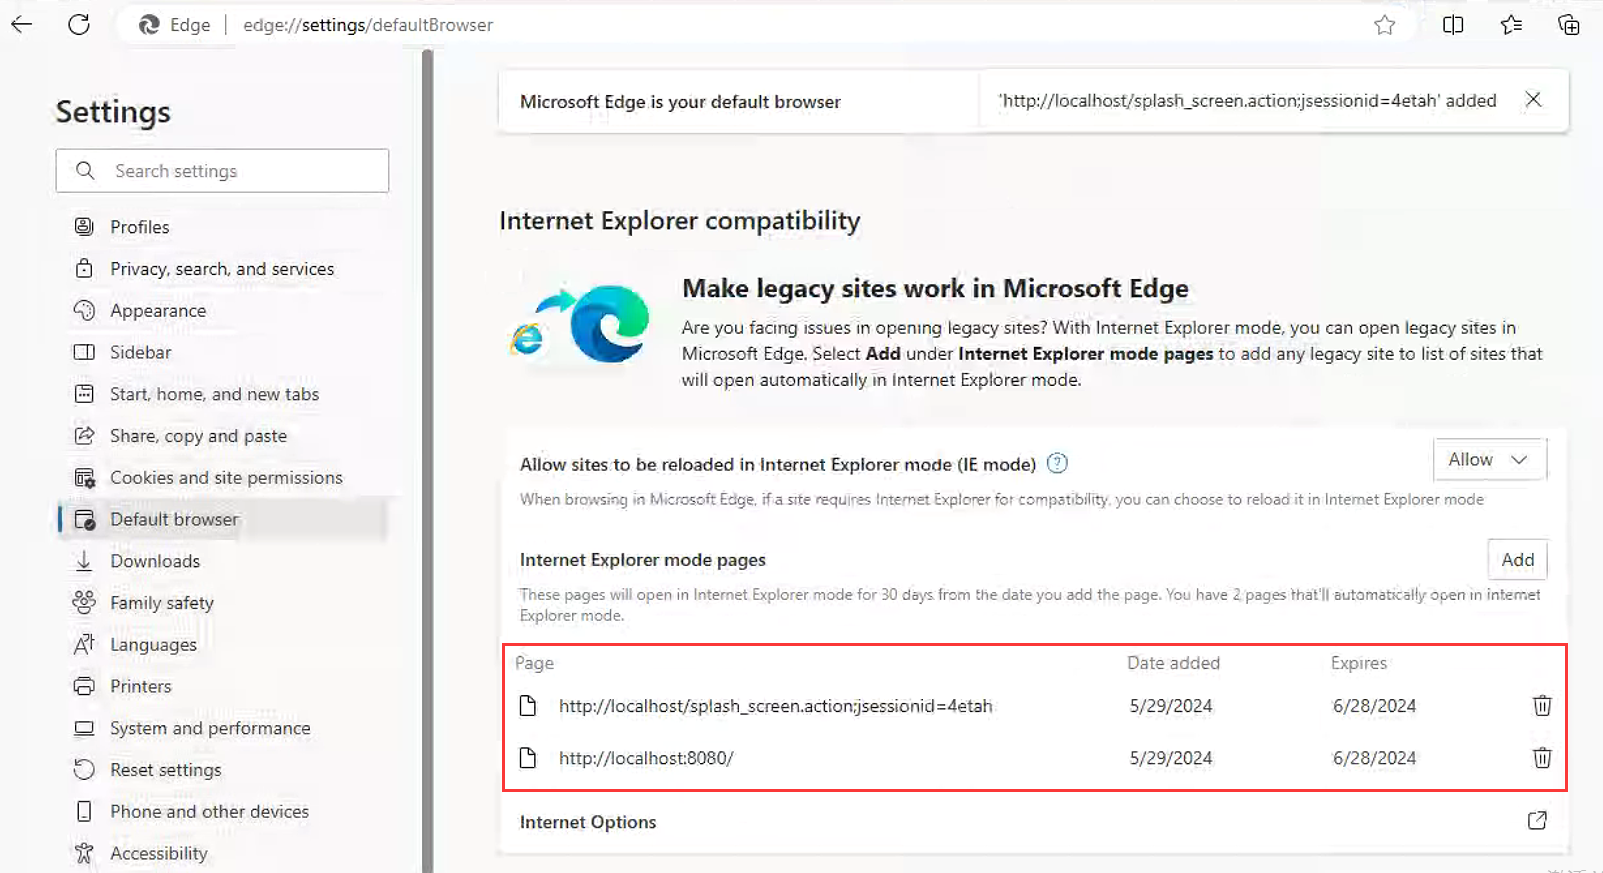
The above problem is very easy to solve, this problem is caused by the Edge browser does not add the IE compatibility mode, we only need to add the IE compatibility mode to the Edge browser.
Step1:
Open the Edge browser, then select Browser Settings at the top right of the browser, and select "Default Browser" at the left of the browser Settings. As shown in the following picture。

Then add the following content in IE compatibility mode, as shown in the following picture:
http://localhost/splash_screen.action;jsessionid=4etah
After the addition is complete, exit the browser and start the JLR SDD software again. The above two error messages will not appear
Solved VNCI PT3G can not connect PIWIS3 software problem
If your VNCI PT3G device is unable to connect to your PIWS3 software, it can be sure that your PIWIS3 software driver has been tampered with.
The tampered driver needs to be changed back to the PIWIS3 OEM driver.
Restoring the PIWIS3 OEM driver is simple and requires only two steps
Step 1: Replace the driver file
Step 2: Execute the PIWIS OEM Driver Registry
PIWIS OEM Driver Download:
https://mega.nz/file/CCpDkK4Q#eleGyKHWB2BQHeOouWgYHNMygpfvy2VRrGqi9ExfoCg
VNCI-Bosch diagnostic interface sync operate with bosch vci device manger
VNCI Bosch Series products:
VNCI MDI2, VNCI JLR DoIP, VNCI VCM3, VNCI RNM, VNCI VDI3, VNCI 6516SZ
VNCI Bosch series products operate synchronously
Sync: Synchronize the current computer VCI driver to the VNCI device so that the currently connected VNCI device can recognize the latest VNCI driver
on the current computer.
Operation:
Step 1: Install the current device VCI Device Manager software
Step 2: Install the VNCI Device Manager software
Step 3: Start the VNCI Device Manager software to complete the VNCI device synchronization with the current computer VCI device manager
Step 4: Start the VCI Device Manager software on the current computer to recognize the current VNCI device without update prompt.
VNCI bosch series diagnostic interface three connection mode
VNCI Bosch series of diagnostic products currently include VNCI MDI2 General Motors second generation diagnostic tool, VNCI RNM Nissan, Renault, Mitsubishi diagnostic tool, VNCI JLR DoIP Jaguar Land Rover diagnostic tool, VNCI VCM3 Ford Mazda diagnostic tool, VNCI diagnostic tool. VNCI VDI3 Roewe Wuling MG Maxus automotive diagnostic tool, VNCI 6516SZ Suzuki diagnostic tool. VNCI Bosch series diagnostic tools support usb connection, AP connection (wifi point-to-point connection) and WLAN station connection (wifi wireless LAN connection), VNCI Bosch series diagnostic products are compatible with Bosch original diagnostic software drivers. The VNCI Bosch diagnostic tool can replace the original Bosch series of diagnostic tools.
Resolve PIWIS3 software cannot connect to VNCI PT3G issue
When your PIWIS3 software cannot connect to the original PT3G/PT4G device or cannot connect to the VNCI PT3G device, your PIWIS3 software driver is tampered with or replaced. At this time, we need to restore the original PIWIS3 driver to normally connect the original PT3G/PT4Gs and VNCI PT3G devices.
The steps to restore the original PIWIS3 driver are as follows:
1. Download the original driver (the current driver version is v3.5.6)
2. Open the PIWIS3 driver location, delete all files below the location, and copy the original driver file to the location.
PIWIS3 driver location path: D:/PiwisApps/VCI/Actia_64/XS_D_PDU_API_64/
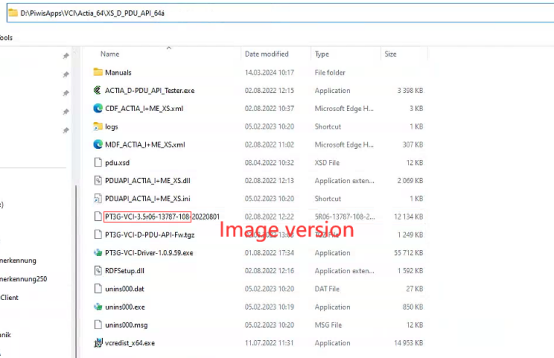
3. Copy the following registry contents to a text file with a.reg suffix, and double-click the file to run it.
Windows Registry Editor Version 5.00

[HKEY_LOCAL_MACHINESOFTWAREACTIA I+ME GmbHPT3G-VCIModule VersionsXS_D_PDU_API_64]

[HKEY_LOCAL_MACHINESOFTWAREACTIA I+ME GmbHPT3G-VCIModule VersionsXS_D_PDU_API_64.5.6]
"Image Version"="3.5r06-13787-108"
"Image File"="D:/PiwisApps/VCI/Actia_64/XS_D_PDU_API_64/PT3G-VCI-3.5r06-13787-108-20220801"
"Module Version"="3.5.6"
"Module File"="D:/PiwisApps/VCI/Actia_64/XS_D_PDU_API_64/PT3G-VCI-D-PDU-API-Fw.tgz"
"Image Boot Timeout"=dword:0001d4c0
"Update Timeout Default"=dword:00003a98
"Update Timeout Image"=dword:00030d40
"Update Timeout Module"=dword:0000afc8
"Module Name"="D-PDU-API"
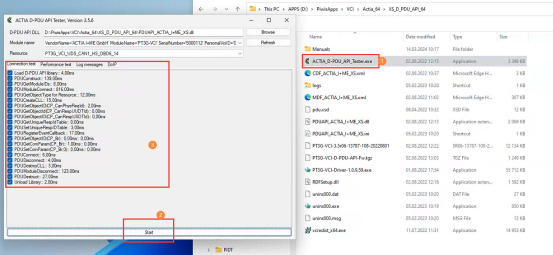
4. Finally, connect the VNCI PT3G or the original PT3G/PT4G device, run the ACTIA_D-PDU_API_Tester.exe program, click Start to run, all communication protocols are completely passed, indicating that the original device driver is fully restored to normal, as shown below:
Solved SDD software does not recognize VNCI JLR DoIP device problem
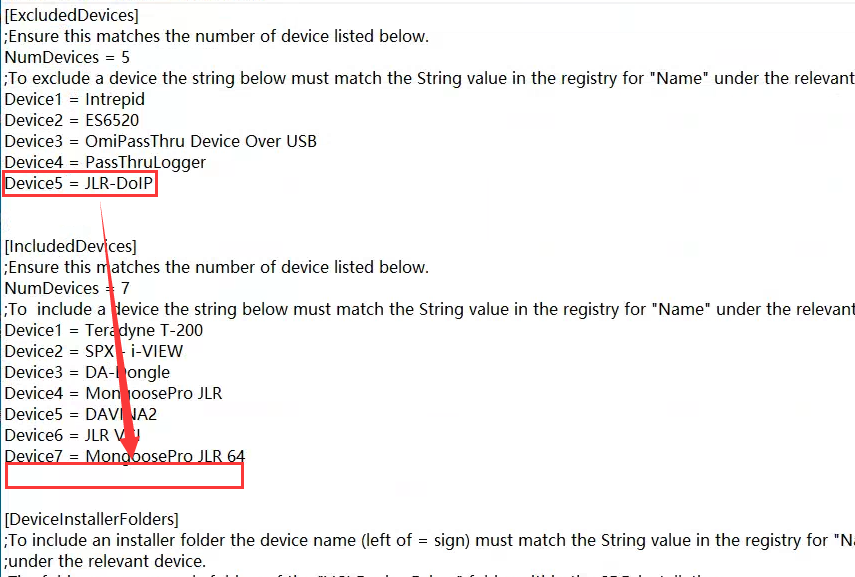
When you install the SDD and JLR driver software, you find that the SDD software does not recognize the VNCI JLR DoIP device. The main cause of this problem is that the SDD software system disables VNCI JLR DoIP.
To solve this problem, we just need to modify the SDD configuration file, it is very easy to do it.
Step1:
installing the SDD software and JLR device manager
Step2:
Open "C:Program Files (x86)/JLR/SDD/Runtime" folder
looking for "GatewayManager.ini" file and edit it
Before editing the file
After editing the file
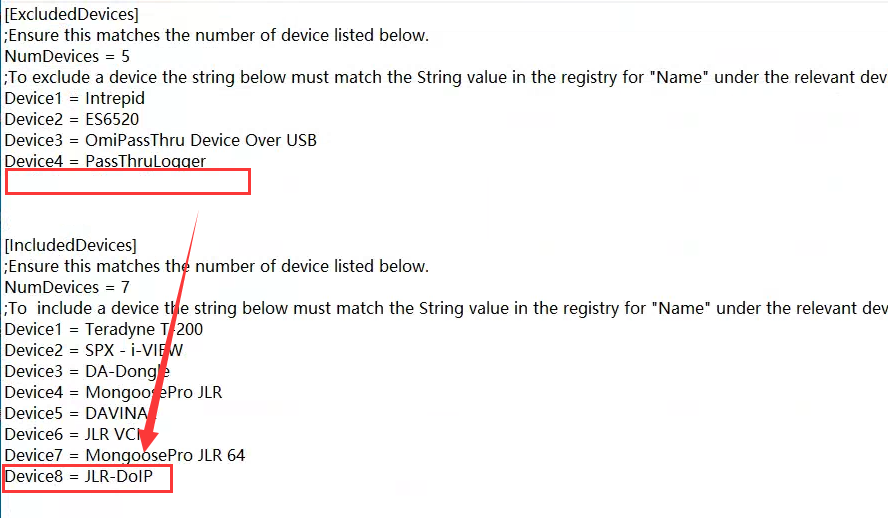
Step3:
Open "C:Program Files (x86)/JLR/IDS/Runtime" folder
looking for "GatewayManager.ini" file and edit it
Edit the file as in Step2
Save the both files and running your sdd software, Your SDD software will be able to recognize VNCI JLR DoIP devices.
how to install tech2win, GDS, DPS, RDS software for VNCI MDI2
How to install C3P, CAN Clip and MUT-3 software for VNCI RNM
install nissan consult 3 plus software video
How to install IDS software for VNCI VCM3
Content coming soon.
How to install ODIS software for VNCI 6154A
There are three main steps to install ODIS software
1. Install the ODIS application
2. Import the license
3. Import the database file